

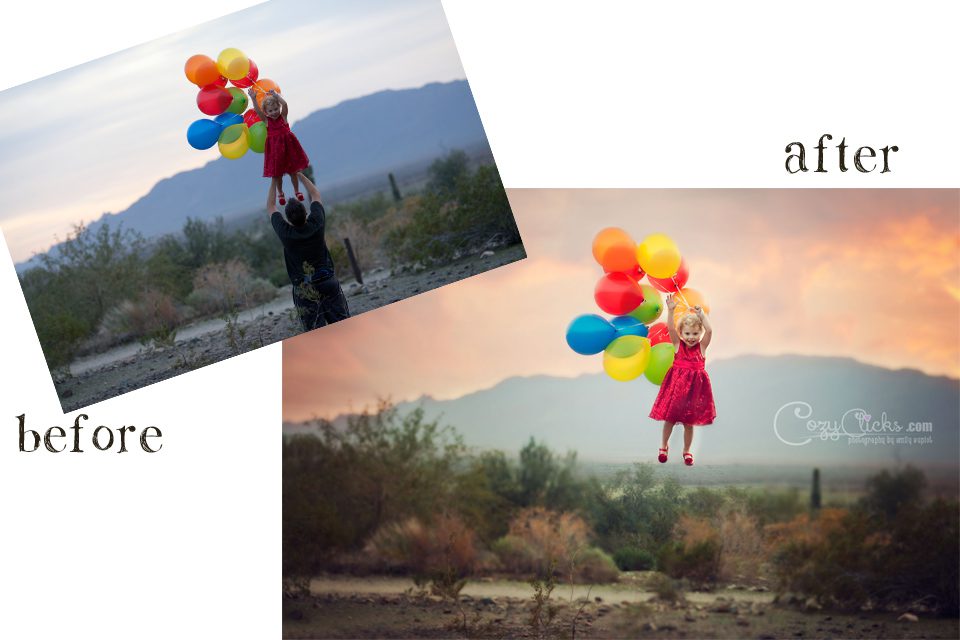
Pictures like this are so fun to create! I love to take on special photography projects once in awhile to push myself creatively. I am also trying to show more of the behind the scenes this year to illustrate the creative process and show that many photos I take are not just simply pushing the shutter on the camera. For this particular photo, I wanted to create a custom Valentine with the theme “Love is in the Air!” Before even attempting to go out into the Phoenix mountains and start shooting I first had to come up with a clear vision in my head of what the photo would look like. This not only included the idea, but I had to picture the desert setting I was looking for, what she would be wearing and the color, and the amount/color/type of balloons I would use to achieve this effect. Curious about how I got from the before to the after? Take a look at the steps below.
 1. Creating the Composite
This is achieved by taking two photos and placing them on top of each other. In order to do this I took two pictures of the same scene: the original that you see above and a second photo where I asked them to step out of the frame and took a shot of just the background. In post production I opened them both up in ACR and made the same adjustments to each photo. Next, I opened them in Photoshop. I placed the plain desert background photo on top of the shot with the girl and lowered the opacity so I could see her. I then created a layer mask and brushed away the areas of the picture that I did not want to show through (ex: dad holding her) The I raised the opacity and was left with an image that appeared to be a young girl being carried away.
2. Color Pop Adjustments
If you notice in the before and after, the composite is not the only thing that is adjusted in the photo. One trick that I love to use to make colors really “pop” is to create a soft light layer. To do this simply choose “duplicate background layer” and choose the blending mode to “soft light”. Adjust your opacity to taste. For this photo, I had it set to 35%.
3. Play with the Levels
This is where you can get really creative with the colors and tones that you want to show through in your photo. Create a new levels layer and play around with the different sliders and color channels. There are such a variety of effects you can achieve here, so play around with it to find your style. For this photo, I adjusted primarily the blue channel for the overall photo and the red channel for her dress and balloons.
4. Finishing Touches
After I was happy with the color adjustments from the levels layer I took a step back to look at the photo as a whole. You’ll notice there is a post on the path and a cactus directly behind her in the original. I did not love those there and found them distracting. To get rid of them I simply used the clone tool to take them out of the picture. Finally I sharpened accordingly for web/print use and that’s it!
I think the most important step when creating a photo is beginning with the end in mind. If you have a clear vision it will help you achieve the final outcome and give you a much more pleasing picture in the end.
Thanks for taking the time to read this. Check back soon for more before and after examples or check out an earlier post here.
This is a great before and after tutorial! I love doing fun shots like this myself. The final image is gorgeous! Cozy Clicks has some serious talent and knowledge for making children’s photos shine!
Awesome blog post! Love seeing the before and after…
Love this! It’s so important as a photographer to know how to create a composite. Fabulous image!
Amazing. I’ll definitely try this idea.
This is a great tutorial on how to create a composite – I love the balloons!
AWESOME work! Thank you for sharing this!
What a great tutorial! I love your creative children’s style and how you show the transformation of your images. Phoenix is lucky to have such a talented professional photographer!
Fun image!
love it, great idea!
So cool!!!
What a fun composite! I love it!
Woow…love the tutorial…its so informative
I love that you shared your secrets! So wonderfully done!
Nice job and great tutorial!
That is awesome! Love it!
Wonderful composite work! That you for sharing so many great tips!
This is so neat! She looks like she’s about to take off!
Well done! Love how this turned out!
LOVE the after!
Nice work and great tutorial! What a cute shot too!
What a great tutorial! Thank you for sharing!!!
Such a cute photo! Love it!
What an informative post! Thank you for inspiring me!
This is so awesome!
Thanks for sharing ! I’ve always wanted to do something like this and now you have inspired me!
wow! This is stunning, you are very talented. Nice work!
This is an awesome tutorial. I love how you explained this composite so well. I will need to try this myself!
I was drawn to this as soon as I saw the image posted. What a fun shot this is! Thanks for sharing your steps in the post. Beautiful, fun shot!
I love this! So many folks don’t get to see all the work we put into composites. This is amazing!
Great tutorial, thank so much!
This is fantastic! Thank you so much!
What a fun and helpful blog post!!